

Android - Using the Values folder to access strings.xml, color.xml and dimens.xml
- Jan 25, 2018
- 5 min read
Hello all,
When you are submitting your projects to the mentors I am sure that a common suggestion you are getting is to stop hard-coding values you use over and over and instead put those values into .xml folders instead. I expect some of you, like me earlier this evening, had absolutely no idea what this meant or how to even begin doing this. For that reason I have created this guide to help you.
So first, we all probably had a nice-looking, functional app that followed all the instructions and looked a little like this in Android Studio.

We are going to focus on these three lines of code here:
android:text="Team A"
android:textColor="#FF0000"
android:textSize="100sp"
Now, all of these lines of code are functional and, because they are only used once within this app, it is perfectly fine to use it in this way. However, if we were to repeat this code over and over again to show Team A or something similar over and over again it would be annoying if we suddenly decided to e.g. change the textColor to green because we would have to go back through all of our code putting in the new Hex Code.
This is where strings.xml, color.xml and dimens.xml comes in. If these values are stored in these files you only have to make any changes to your whole document once, in these files.
But where can you find these files? Let me show you…
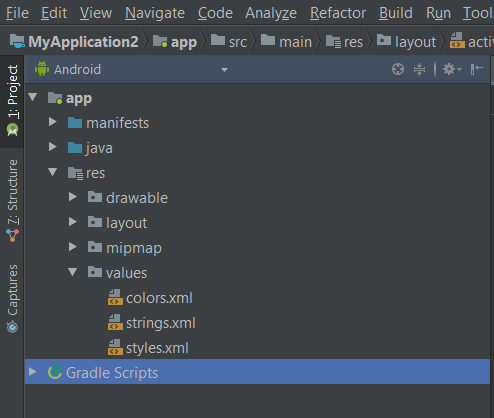
This image is a close up of the upper-left corner of your screen in Android studio. To access the colors.xml, strings.xml and (for the moment) styles.xml files you need to click on the triangle of app > res > values. Then you can double click on the file you want, let’s start with colors.xml…
Double click on colors.xml and a new window will open in the place of the activity_main.xml file we are used to working in. The middle column of Android Studio, where we currently do most of our work, should now look like this:
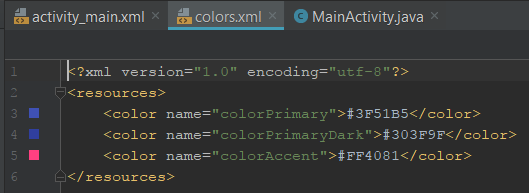
Notice how there is a new, highlighted tab at the top of this column called colors.xml. You can click on the activity_main.xml and colors.xml tabs to switch between working in the area we are used to working and this new area. You will probably also notice that this file already has some color values in there: colorPrimary, colorPrimaryDark and colorAccent. These are pre-loaded on each new app you make and control the color of the title bar. Feel free to change the hex-code value to change the color of the title bar. For now, though, let’s just add a new color value to change the color of our text to green. The new line of code we are going to add is:
<color name="green">#008000</color>
Let’s break this line of code down. color just establishes that this new value is indeed a color and will allow us to call this value in our main_activity.xml file in a moment. name=“green” is where we give this new value a label and this can be anything we want but needs to follow usual android naming conventions and should reflect the value we are giving. #008000 is the hex-code which will soon turn our text green. Finally, the color value is closed with </ color> (ignore space here) using the now familiar </> closing symbols. Now our colors.xml file should look like this:

However, the color of our text in the main_activity has not yet changed. Let’s click on that tab to fix that. Once you have done that you want to focus on this line:
android:textColor="#FF0000"
The majority of this line can remain the same, all we need to change is the part in-between the quotes. To look like this:
android:textColor="@color/green"
Again, lets break this change down. @color/ tells the phone/computer to look in the color.xml file for the code that it needs. The green part tells is to choose this particular line of code in the file rather than colorPrimary or one of the others. Now our preview should look like this:

Yay! It’s changed from red to green. Phew, well done. You’ve just defined some reusable code rather than hardcoding it. Good job.
Let’s try it again, this time focusing on the string. First let’s double-click on the strings.xml folder that should still be visible from before. If it isn’t visible, and you can’t be bothered to scroll up ;), you need to click app > res > values to make the top-left side of your screen look like this again.

Now the middle part of your screen should look like this:
Let me point out a few things here:
The activity_main.xml tab is still there for you to quickly get back to it.
The colors.xml tab is still there in case you want to change the color back to red.
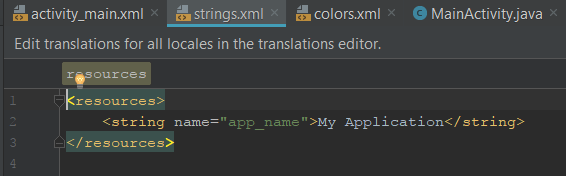
There is now a new highlighted strings.xml tab.
In this new file there is, again, already a line of code there.
This line of code should have the title for your app. This means if you change the white text in-between < string> < /string> you can change the name of your App. Great if you made a spelling mistake when setting it up or just thought of a much cooler name afterwards. Again,we are going to add a new line of code here that should look a bit like this:
<string name="team_name">Team B</string>
Like before, let’s break this line of code down. string just establishes that this new value is indeed a string and will allow us to call this value in our main_activity.xml file in a moment. name=“team_name” is where we give this new value a label and this can be anything we want but needs to follow usual android naming conventions and should reflect the value we are giving. Team B is the text which will finally appear on our screen. Finally, the string value is closed with </string> using the </> closing symbols again. Now our string.xml file should look like this:

Let’s return to the activity_main.xml file to finalize these changes. This time we are focussing on the line:
android:text="Team A"
Again, it is only the code in-between the quotes that needs to change to:
android:text="@string/team_name"
Let’s look at this change more in-depth. @string tells the phone/computer to look in the string.xml folder for the code it wants. team_name tells it to focus on that particular line of code.
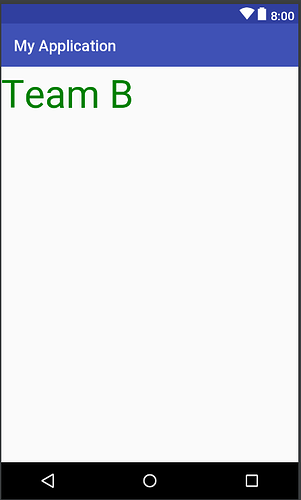
Let’s check our preview again…
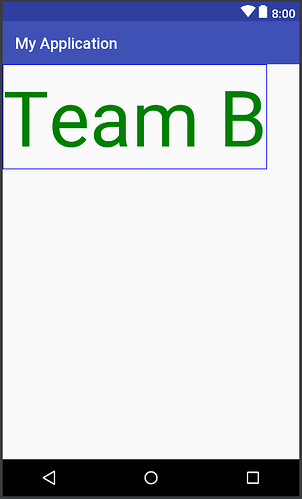
Team A has officially changed to Team B, awww yeah!
Finally, let’s change the textSize using a dimens.xml folder… For some of you, this may be no problem but for anyone like me who doesn’t have a dimens.xml file in their values folder this seems like quite the obstacle. Never fear, we even have a solution for this! Right click on the Values folder then hover over New to bring up another sub-menu and select Values resource folder in there:

That should bring up a window like this:
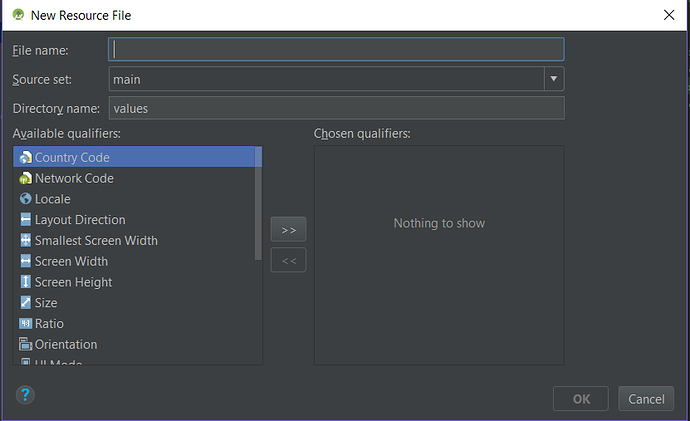
Just type in something along the lines of dimens.xml into the File name: line then click OK. The middle column of Android Studio should now look like this:

Make a line or two of space between < resources> and and put a line of code like this between them:
<dimen name="text_size">50sp</dimen>
dimen tells the computer that the following value is going to be a dimension. name=“text_size” refers to this line of code and will allow us to call it in activity_main.xml in a moment. 50sp is the new dimension we are going to be giving our text (expect it to be half as big.) And we close the dimen line with the </> closing tag.
Return to the activity_main.xml file and change this line of code:
android:textSize="100sp"
to
android:textSize="@dimen/text_size"
If you have done that your preview should now look like this:
Your text is now half the size. High Five!
Shout out to all the moderators at Udacity who helped me with this.
Links that helped me:
https://developer.android.com/guide/topics/resources/more-resources.html#Color2 https://stackoverflow.com/questions/29128178/how-to-use-dimens-xml-in-android3 https://stackoverflow.com/questions/7508493/when-should-the-dimens-xml-file-be-used-in-android3 https://stackoverflow.com/questions/43709943/cant-find-dimens-xml-file-how-to-create-one1


Comments